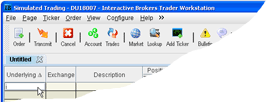
TWS QuickStart
1. Add Market Data
Click your mouse in a blank line in the Underlying column and type in a symbol. Press Enter.

Select an instrument type from the list, and press Enter.

Click Smart from the Exchange list and then click OK.
You'll see your new line of market data including the bid and ask prices and sizes. At the top of the grid are two rows of column titles. The titles in the top row (Position, Bid Size, Bid Price, etc) apply to the market data line.

For more information on market data, see the TWS Users' Guide.
2. Place an Order
Click your mouse in the Ask Price or Bid Price on a market data line to create an order.

Click the Ask price to create a BUY order.
Click the Bid price to create a SELL order.
The order line is created directly below the market data line. At the top of the grid are two rows of column titles. The titles in the bottom row (Time in Force, Action, Quantity, etc) apply to the order line.
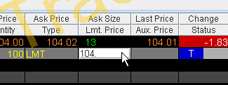
To change the order price, click in the Lmt Price field and enter a new value.
To confirm the order, click the "T" which appears in the Status field.

The Order Confirmation window shows order details along with a total estimated price and your margin impact. Click Transmit to send the order.
Once your order has been transmitted, it appears on the Pending page until it executes. The order status is conveyed by specific colors in the status field.
For more information on order management, see the TWS Users' Guide.
3. View Executions
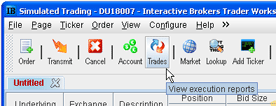
Click the Trades icon on the Trading toolbar to open the Executions window.

The Executions window displays reports for all executed orders, and summarizes activity by contract on its Summary tab.
For more information on Execution reports, see the TWS Users' Guide.
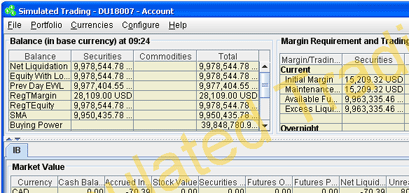
4. Monitor Account Activity

Click the Account icon on the Trading toolbar to open the Account Information window.
To manage your IB account and view statements and reports from the website, on the View menu select Account Management.
For more information on fields on the Account window, see the TWS Users' Guide.
5. Enable More Features
The TWS advanced features are disabled by default to keep the interface simpler while you become comfortable with the basic functionality. When you're ready to view and activate other features, use the Feature Selector.
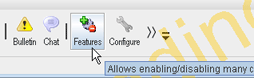
Click the Features icon on the Trading toolbar to open the Feature Selector.

To list specific features, type a search word in the box at the top of the window.
Put a check next to features you want to enable, and click OK.
For more information on the Feature Selector, see the TWS Users' Guide.
6. Customize and Configure TWS
As you continue to use TWS, you may come across instances where you'd like to be able to change a default value or layout. You can customize almost anything in the application via Global Configuration.
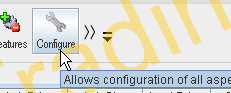
Click the Configure icon on the Trading toolbar to open Global Configuration.
To find specific features, type a search word in the box at the top left pane.
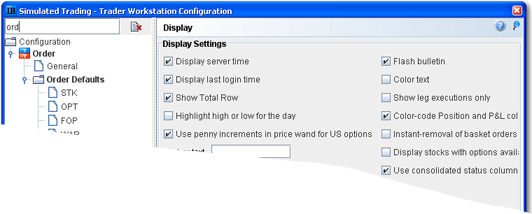
Change configuration settings for any feature by selecting the feature in the left pane and making changes in the right pane.
Click OK.
For more details on using Global Configuration, see the TWS Users' Guide.
7. Help and Hints
Getting More Help
Click the question mark icon in the top right corner of any TWS window to get page-specific help.
If the online help doesn't provide an answer to your question, click the Chat icon on the Trading toolbar. In the Customer Service area, click the Customer Service Tools icon to view all of your CS options.
For more help options, see the TWS Help menu.
TWS Hints
TWS includes a right-click menu for quick access to most features.
Trading screen fields are "context sensitive," which means that values displayed from any of the dropdown lists are valid based on other parameters you have selected. For example, when you click in the order Type field on an order line, only order types that are valid for the specific order are displayed, based on routing, instrument type and other order directives.
Click and hold the mouse in the Price field of an order to see the "Price Wand" which displays a ladder of incrementally higher and lower prices from which you can choose.
You can set up task-specific hotkeys to perform common actions with a single keystroke or mouse click using the Hotkeys command on the Configure menu.
TWS Icons
The helpful icons below are found on various windows throughout the application:
|
|
The Configuration Wrench provides one-click access to the Global Configuration page for the feature on which you're currently working. |
|
|
Right-facing double arrows appear when items are disabled in the Feature Selector. Click the arrows to view and activate the disabled item(s). Downward facing arrows appear when there is not enough room to fit all items. Click to view remaining items. |
|
These icons appear in the upper right corner of the TWS window, and are described individually below. |
|
|
|
The red Target icon changes the focus of the feature to whatever you've selected. For example, if you're viewing a chart for ABC and want to create a new chart for symbol DEF, you only need to activate the target icon by clicking on it (to make it red), and then click the market data line for DEF. Your chart's focus will automatically be changed. |
|
|
When clicked, the Full Screen icon enlarges the selection to fill the window and allow a larger viewing area. It remains visible and will revert to the original screen display when clicked a second time. |
|
|
The Question Mark opens a context-sensitive help page that provides information on the active feature. When you are pointing to an icon it changes color so you know you have it. |
|
|
When pushed, the Pushpin keeps the selected window on top of all other windows. A red aura appears around the pin to let you know it is active. |
TWS Colors
The colors in TWS convey the following information:
|
|
LIGHT GRAY indicates that you are in the process of creating an order and you have not yet transmitted it. |
|
|
LIGHT BLUE indicates that you have transmitted your order, but have not yet received confirmation that it has been accepted by the order destination. |
|
|
PALE PURPLE indicates that an order has been accepted by the system (simulated orders) or an exchange (native orders) but that currently the order is not working, due to system, exchange or other issues. When the order becomes active, the order status color will change appropriately. |
|
|
DARK BLUE indicates that an order has been accepted by the system (simulated orders) or an exchange (native orders) and that this order has yet to be elected. The order status remains DARK BLUE until the election criteria are met. At that time the order is triggered, the order status color will change appropriately. |
|
|
GREEN indicates that your order has been accepted and is working at the order destination. When you display the Shortable market data column, this color indicates that at least 1000 shares are available to sell short. |
|
|
DARK GREEN is used in the Shortable column and indicates that this contract can be sold short but that at the moment there are no shares available for short sale, and that the system is searching for shares. |
|
|
MAGENTA indicates that you have sent a request to cancel the order but have not yet received cancel confirmation from the order destination. At this point, your order is not confirmed canceled. You may still receive an execution while your cancellation request is pending. |
|
|
BURNT ORANGE indicates that a cancellation request has been accepted by the system but that currently the request is not being recognized, due to system, exchange or other issues. At this point, your order is not confirmed canceled. You may still receive an execution while your cancellation request is pending. |
|
|
RED indicates that the balance of your order has been confirmed canceled by the system. This could occur unexpectedly when the destination has rejected your order. In the Shortable column, RED indicates that no shares are available for short sale. Once the order is confirmed canceled, the Order Management line will disappear from your trading screen after 30 seconds. Please see the Customer Agreement for further information on order confirmation and order cancellation. |
|
|
MAROON indicates that an attached simulated order type has been accepted by the system and has yet to be elected. The order is held in the IB system (and the status remains MAROON) until the election criteria are met. At that time the order is transmitted to the order destination specified and the order status color will change appropriately. |